")
How to Embed Spotify Playlists in WordPress (With and Without Plugin)
Your favorite playlist can keep visitors on your site longer if only you knew how to add it properly. Many...

Images are what make any website interesting. They not only nurture the aesthetic appeal, but also significantly add to the user experience and search visibility of the site itself. But sadly, images that take a long time to load do the contrary. They become a bottleneck for page speed, turn off search engines, and frustrate visitors.
You can optimize images for WordPress for enhancing site performance and user experience to its fullest. Optimization means working with proper compression and format while retaining image quality. From picking the correct file format to implementing varied plugins, modifications mean a lot.
So, let’s dive in to understand how a WordPress development company performs image optimization for faster load times, improved SEO, and higher engagement for the site. Here we go.
Table of Contents
Image optimization is an essential facet of WordPress website looking for the best performance and user experience. Here’s why it matters:
Large images make your website take longer to load. Optimized images reduce file sizes while maximizing quality for faster experiences. Visitors tend to hang around such websites and their bounce rates go down.
Google’s algorithms tend to prioritize faster loading websites. Optimized images improve loading speeds and, thus, enhance Core Web Vitals scores. Add to that, faster sites positively influence the website’s search visibility, which can translate into more organic traffic.
Unoptimized images take up the server resources more than necessary. That adds to the hosting costs. Smaller image files take less bandwidth and save the server from going down. This is very helpful when the website has heavy traffic or limited resources.
Mobile users expect fast-loading websites, and large images slow pages down. Optimized images load quickly even on slower mobile networks. A better mobile experience leads to higher engagement and lower bounce rates.
Again, slow-loading images frustrate the visitors, who may just abandon your website. Fast-loading pages better the user experience as they enable the visitors to browse more content seamlessly. And eCommerce sites benefit from fast-loading, high-quality product images, which in turn helps sales.
Large images take up unnecessary storage space, which means larger backups. Optimizing these images will clear up some storage and improve the site performance. Smaller files go a long way in maintaining smooth site performance over time.
Optimizing the images helps your WordPress site load faster and rank higher. Plus they ensure a better experience for all users. That’s why they are a key part of performance-focused WordPress development services.
Manually optimizing images is an extremely tedious task. But a few WordPress plugins could really make a difference in it. Most of these plugins help with automatically compressing, resizing, and converting images. That will, in turn, help you improve the performance of your site.
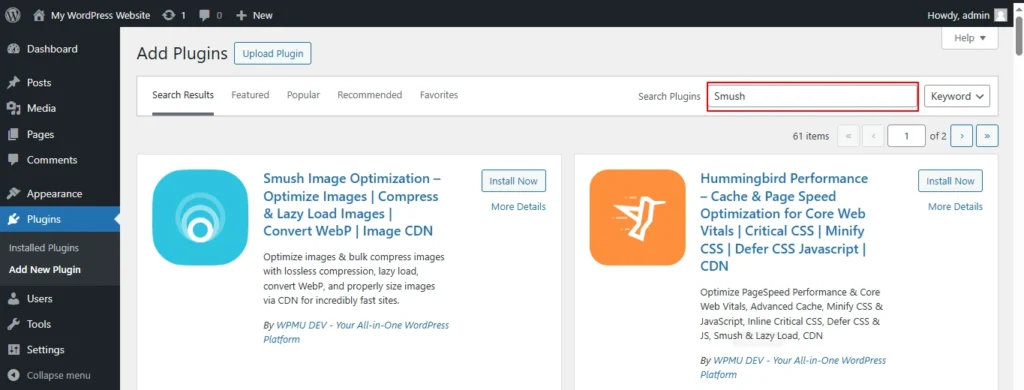
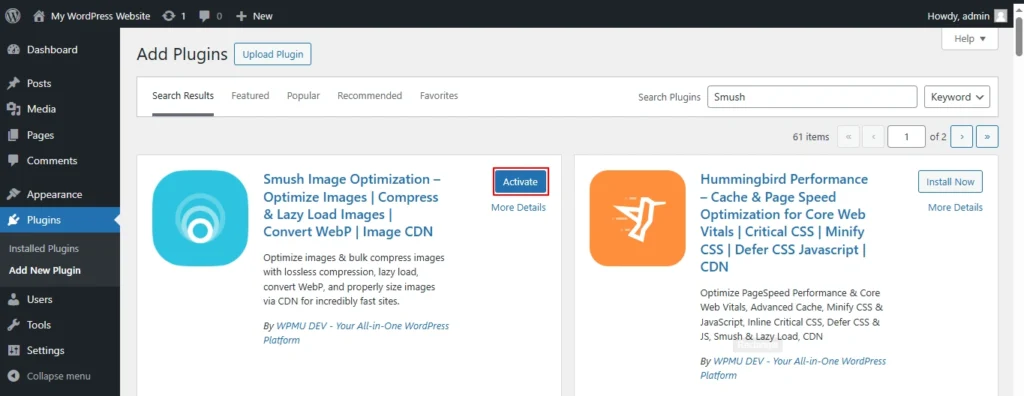
Now, to install a plugin, you will need to open the WordPress admin dashboard and navigate to the ‘Plugins’ section. o to the ‘Plugins’ section. Find the plugin you need and click ‘Install’, then ‘Activate’.
Smush is the most popular plugin for compressing images without compromising on quality. It helps reduce site load speed through lazy loading, bulk optimization, and automatic resizing.
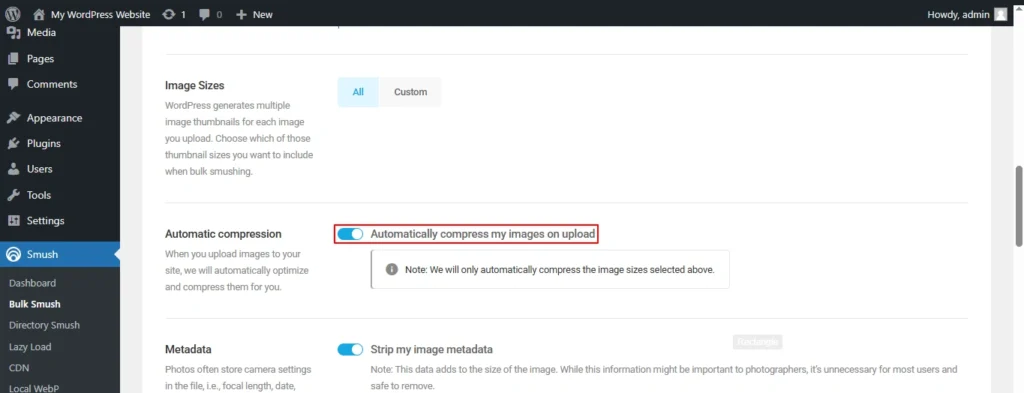
Step 1: After the plugin is activated, go to ‘Smush Settings’ under the WordPress menu. Enable the toggle in front of ‘Automatic Compression’. That will automatically compress the images upon upload.
Step 2: Under Smush settings, there is ‘Lazy Load’. Enable the toggle switch to activate lazy loading. That will defer the images from loading offscreen.
Step 3: Next, go to the ‘Bulk Smush’ section to check for all images in your media library that need optimization. Then you can optimize them all at once.
Step 4: You can also amend ‘Advanced Settings’ to adjust levels of compression and automatic optimization for new uploads.Ideal For: Website owners looking to compress images in bulk free and with just a few clicks.
Optimole is a cloud-based image optimization plugin that automatically compresses images for display via its CDN. That ensures better performance and sends images to browsers in the best format depending on their capability.
Step 1: Activate the plugin and register for a free Optimole API key on the official website.

Step 2: Type the API key in ‘Optimole Settings’ to connect your website to the Optimole account.
Step 3: Enable ‘Automatic Image Optimization’ and ‘WebP Conversion’ in settings.
Step 4: Configure ‘Lazy Loading’ so that it loads when it is only needed.
Step 5: Optimole will do everything for you in terms of automatic optimization of images. It will then serve the optimized images via its CDN.
Ideal For: Users wanting optimization in the cloud and images delivered automatically through a CDN.
EWWW Image Optimizer will automatically resize and compress the images during the uploading process. It also provides server-side optimization, which gives the introduction of not requiring an API key to start optimizing images.
Step 1: Activate the plugin and go to Settings > EWWW Image Optimizer.

Step 2: Activate the ‘Automatic Image Optimization’ to compress new uploads.

Step 4: Use the ‘Bulk Optimizer’ tool to optimize existing images in your media library.
Step 5: Configure advanced settings like ‘WebP conversion’ and ‘Lazy Loading’ if needed.
Ideal For: Users who need a free, unlimited compression tool with advanced optimization options.
Imagify is an image optimization plugin developed by the creators of WP Rocket. It offers three compression levels (Normal, Aggressive, Ultra) and automatically converts images to WebP format.
Step 1: Activate the plugin and sign up for a free Imagify account.
Step 2: Generate the API key from the official account.

Step 3: Paste the API key in the Imagify Settings to activate the plugin.
Step 4: Select the required level of compression (Normal, Aggressive, or Ultra).
Step 5: Enable WebP Conversion to serve light-weight .webp images.
Step 6: Use the Bulk Optimizer to compress all images together.
Ideal For: Users looking for a very intuitive plugin with different compression levels and WebP support.
ShortPixel Image Optimizer is a multifunctional plugin that compresses images and converts them to WebP. It also integrates with a CDN. This plugin offers free and premium plans to perform high-quality compressions between free and paid services.
Step 1: Activate the plugin and sign up for an API key on the ShortPixel website.

Step 2: Insert the API key in the ‘ShortPixel’ Settings.
Step 4: Choose from ‘Lossy’, ‘Lossless’, or ‘Glossy’ compression modes that meet your needs.
Step 5: Enable ‘WebP Conversion’ and ‘Lazy Loading’ for better performance.
Ideal For: Website owners who are looking for a high optimization tool with WebP support and CDN integration.
Using a WordPress plugin is the easiest way to optimize images without compromising quality. Choose one compatible and convenient for your needs so that pages load fast and provide an improved user experience. Or you can create a custom plugin tailored to your WordPress website.
Manual image optimization before uploading is the best way to take control over their quality and file size. It can also come in handy in cases where adjustments are so precise that plugins would not be able to make it. Here’s how you can optimize images for WordPress without using a plugin:
Choosing the image format should be in accordance with bringing an image to the best quality at the smallest file size.
Best Practice: Convert PNGs to JPEGs when trying to reduce file size.
Oversized images slows down your website. Resize images to match the display dimensions required by your WordPress theme. Some of the tools you can use includes:
Best Practice: Keep images below 150 KB for optimal performance.
Compression reduces the size of files without noticeable quality losses. The following are some sites for image compression:
Best Practice: Aim for 60-80% quality in lossy compression to balance quality and file size.
Lazy load only loads an image when it is on the screen. It opens a page to load more quickly. To lazy load, just open the functions.php file for your current theme and add this line of code:
add_filter('wp_lazy_loading_enabled', '__return_true');
Best Practice: Ensure WordPress lazy loading is enabled by default (WordPress 5.5+ supports native lazy loading).
Manually optimization ensures maximum control over file size, quality, and performance. That means best results for your website in terms of performance and user experience. For manual image optimization and other performance strategies, connect with our WordPress development company.
Optimizing images entails bringing down the file size without affecting the quality. That effectively improves website performance, user experience, and in turn, the search visibility. Below are some essential guidelines to follow.
These strategies can help ensure your images (no matter how many) load quickly. At the same time, they are of the highest quality.
JPEG, PNG, and WebP are the three well-used image file formats. While JPEG is perfect for photos, PNG is a good image format used for transparency. WebP is a new and modern approach for a better quality of compression. It assures smaller size and higher quality.
Lazy loading causes images that are off-screen to load when the user scrolls to a point near them, enhancing initial page speed. Most of the modern WordPress themes and plugins like WP Rocket make use of this feature. So better enable it for performance.
Yes, faster images load your site speed and increase your Core Web Vitals. Since Google and other search engines value the performance and user experience, it will help improve the search rankings. Adding alt text also helps search engines understand your images.
WordPress has many thumbnail sizes, but it can’t magically compress or convert images. One must either install a plugin (like Smush) or do some manual optimization before uploading.
Every image should have an average above 100 KB (or 200-300 KB for high-grade hero images). Above that, images must be compressed or served with next-gen formats such as WebP.
Yes, for logos, icons, or simple graphics. They are very scalable and small in size because of being vector-based. However, you should avoid SVG for complex images due to security risks caused by lack of sanitization.
Image optimization is all about faster, more user-friendly, SEO-friendly WordPress websites. Large images or uncompressed images slow down the page speed, which turns into a bad experience for the users. Optimization involves choosing the right file formats (like WebP, PNG, or JPEG), compressing images, and resizing them.
There are two ways to optimize images for WordPress. First, there are plugins like Smush, ShortPixel, and Imagify, which compress and convert format automatically. For the manual approach, TinyPNG and Squoosh are useful in optimizing images before uploading them. Other than that, to maintain site loading time, you can set up lazy loading and CDN.
If you still need help with image optimization and other performance improvement strategies, connect with our experts today!
Your favorite playlist can keep visitors on your site longer if only you knew how to add it properly. Many...

When a website goes offline too many times, it hurts the credibility of the business. That means potential opportunities lost...

If your current website feels limiting, expensive, or just frustrating to manage, you’re not alone. Many business owners and bloggers...