If you know anything about WordPress, you might be aware of how special plugins are. However, using a predeveloped WordPress plugin and creating one of your own are two totally different things. Now, it is understandable if you don’t even know where to start with this.
Along with providing several built-in functions and features, WordPress allows websites to be highly customizable, thanks to its vast range of plugins. Any plugin aims to let the developer update or customize any element of the website without writing or editing even a word of code.
For instance, WooCommerce is one of the most commonly-used plugins to help turn an ordinary website into an eCommerce website that lets you easily sell your products and services. Then there’s Yoast SEO, a plugin with advanced SEO (search engine optimization) features to help a website achieve the top ranks on the SERPs.
Just like that, there are thousands of free and premium plugins in WordPress’ official library alone. So before you think of designing your own proprietary plugin, check the library to see if a predeveloped plugin could fulfill your requirement.
If no plugin fulfills your purpose, follow this tutorial to develop your own easily.
Table of Contents
Basics Of Developing A WordPress Plugin
Let’s first understand a few basics of plugin development before looking at the step-by-step procedure:
Action
You can easily add or alter the functionality through the action hook function add_action(). After the action hook is triggered, you will have to execute the ‘Callback’ function.
For instance, save_post is triggered once a page or post is created or updated. You can define the action with the do_action() function.
Here’s how you can use the add_action() function:
Through this piece of code, you can ensure that the function custom_callback_function() will be triggered every time WordPress saves a post.
Filters
These hooks let you change the contents displayed to the user by modifying the functionality.
The function used for filters is add_filter(). Plugin can bind the callback to a filter hook to effectively modify the data.
For instance, you can apply the filter the_title to a post retrieved from the database before it is displayed or printed on the screen. The function apply_filters() is used to define the filters.
Here’s how you can use the add_filter() function:
Shortcodes
With Shortcodes, you can easily insert a dynamic HTML element into any post or page. The user-facing bits of code provides the developers with an effortless way to develop and display custom features and functions to the visitors.
You can use the add_shortcode() to create your own shortcodes.
Here’s how a shortcode displays a custom text
Widgets
When in need of different ways of displaying your plugin’s content to the user, developers can use Widgets. The WP_widget class in PHP can help you create a widget for your plugin.
Before you start creating your own plugin, here are a few topics you can refer to understand the working of plugins:
These references and tools can help you create plugins with unique features and functions.
Key Steps To Develop WordPress Plugin
After checking out the basics, let’s discuss the key steps of creating WordPress Plugins:
Step 1: Choose The Name Of Your Plugin
When creating a new plugin, the first step is obviously choosing an appropriate name for it. Not only should the name be unique and catchy, but they should also be relevant to the functions.
You might also want to perform a Google search and check the official WordPress Plugin library to ensure there are no other plugins with similar names. Also, remember that you will also be using this name for PHP files and plugin folders.
You may also need to use an abbreviated version of the plugin name as a prefix to avoid naming collisions (it’ll be discussed later). So make sure you choose a name that can be easily abbreviated to create a unique identifier.
Step 2: Create The Plugin Folder and PHP File
First, your plugin will have to be stored somewhere. So after deciding on the name, next, you’ll have to create a storage folder for it.
To start with, go to the wp-content/plugins folder on your WordPress installation, create a new folder, and name it after your new plugin. Remember to separate the words in the plugin using hyphens. For example, “plugin-name”.
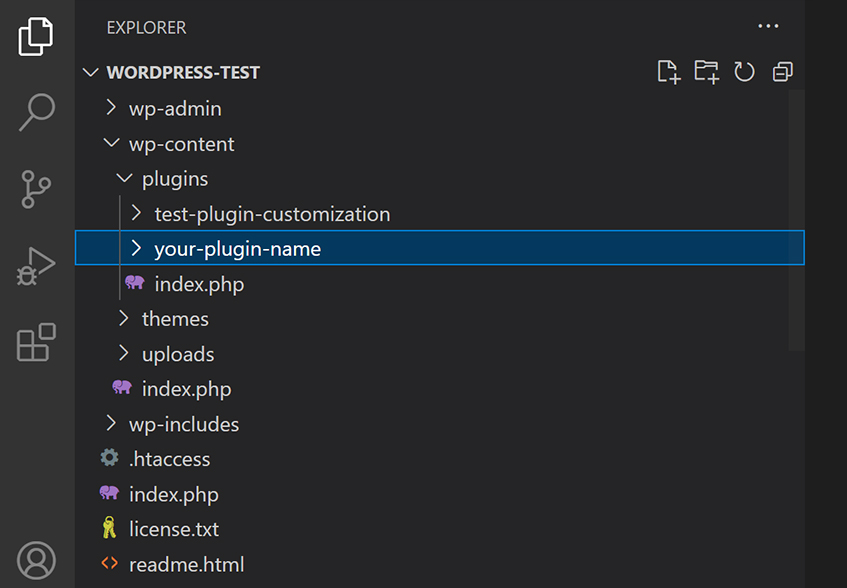
After setting up your plugin’s folder, create a PHP file inside it. The naming format will be the same as the folder with the addition of .php. For instance, “plugin-name.php”.
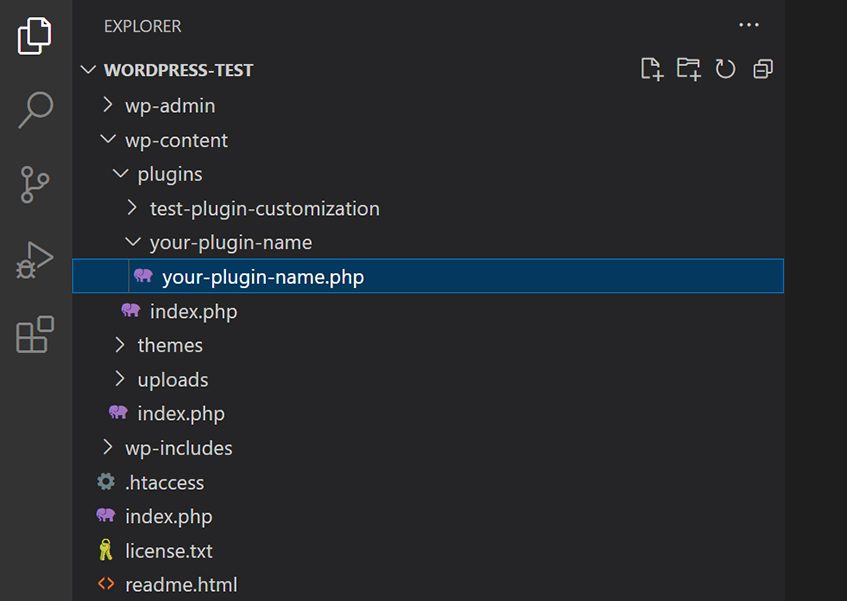
If your plugin is more complex, there might be multiple PHP and other files. For instance, there might be separate files for CSS, language, and so on.
Step 3: Add The File Header
After creating the main plugin file, you’ll have to add the file header, which is basically a PHP block comment, including the metadata about your plugin.
Add this code inside the file:
Obviously, the details in the code mentioned above will be according to your plugin. Also, if you have multiple PHP files in your plugin directory, make sure you add the file header to only one of them.
This header must at least have your plugin’s name. But you can also include the essential information about the author, license, and so on.
Save the changes after you are done, and your plugin will be added to the WordPress library. Just to make sure, click on Plugins on your WordPress admin dashboard.
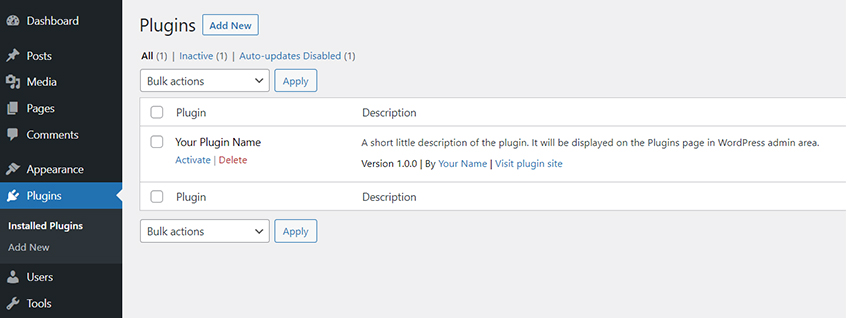
You should be able to see your new plugin in the library. However, don’t rest easy, as there is still much left to do.
Step 4: Add Functions To Your Plugin
Now that you have named the plugin and created a folder for it on WordPress, it’s time to add functions to it. In this step, you work on realizing your ideas and imagination for your plugin. The plugin handbook should come in handy.
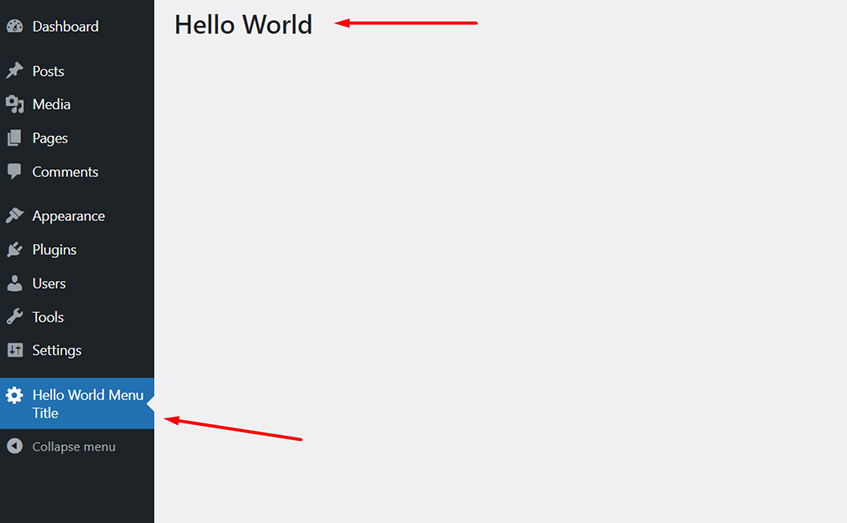
In the following example, a simple WordPress admin page with the text “Hello World” has been created. It adds a menu item when an admin page is added.
This piece of code adds a menu item and executes the function hello_world_admin_menu through the action hook admin_menu. In the function, the inbuilt function add_menu_page() adds a page and a menu item for the plugin on the WordPress admin. You can add the menu title, menu slug, page title, capability, and a callback function (page contents are defined in the callback function).
Step 5: Compress The Plugin Folder
Developers tend to work on WordPress plugins in the development environment. If you want to shift the plugin to your production site, the plugin directory would have to be compressed, and the zipped plugin file will have to be uploaded to WordPress Admin.
Step 6: Activate & Use Your Plugin
After creating the first version of your plugin, the fun begins; Using the plugin to develop or upgrade your WordPress-powered website.
If the plugin is already present in your WordPress directory, just navigate to the Plugins screen and click Activate. After that, you can test your plugin and make the alterations and upgrades accordingly.
If the plugin is in a .zip format folder on your PC, it would be straightforward to add it to the library. Navigate through this process. Plugins -> Add New -> Upload Plugin -> Choose File.
These steps must be followed to the point to make sure the plugin works well on your website.
Best Practices Concerning WordPress Plugin Development
Here are a few things to remember while developing a new WordPress plugin:
-
- With the right tools, WordPress plugin development can be quick and easy. You will need a text editor you are comfortable working on, a suitable FTP client to shift the files between your PC and server effortlessly, and a development server for testing your plugin. These tools will help you create an excellent plugin through prompt testing and upgradation.
-
- Creating a plugin from scratch needs quite a lot of time and resources. Although there is no typical process for plugin development, you can use a boilerplate, as it simplifies the process, and you can save some time by reusing the code.
-
- During the plugin development, try using WordPress’s built-in functions and features as much as possible. It will help bring down the development time and avoid the rework. Also, it would be good if you adhered to the WordPress coding standards.
-
- Use MVC structure to ensure there is a consistent structure so that other developers can later add to your plugin easily.
-
- Upgrade your plugin regularly to ensure it is compatible with the latest versions of WordPress and PHP. It will protect your websites from hackers.
Following these basic practices will ensure the plugin works perfectly and your website is able to use all its features with ease.
Bonus Tips From WPPlugin Experts
Here are a few tips from the experts that will help you create the best WordPress plugin:
Always sanitize and escape data
When developing a plugin, you must secure its output with the help of suitable WordPress data sanitization functions. Otherwise, you may make your plugin and website vulnerable to hackers. Here is a PHP statement as an example:
Writing like this will allow the intruders to add custom JavaScript or MySQL codes, leading to MySQL or XSS injection attacks. That’s why it would be better to add the built-in security function and write:
esc_html function helps escape all the JavaScript and HTML codes in your variable, securing it against attacks. There are several other similar functions, for which you can refer to WordPress Codex.
Wherever Possible, Use WPDB
If you are writing a plugin that does customized CRUD (create, read, update, delete) operations in the database, it would be best to use the WordPress database abstraction class known as wpdb.
There are several benefits of using WPDB. First, and arguably one of the most popular ones, is security. Instead of writing your own security measures for your queries, wpdb provides built-in security measures for protection against database hacks like $wpdb->prepare.
Moreover, $wpdb can help save quite a lot of time.
Always consider internationalization (i11n) to translate your plugin easily
The process of developing your plugin with the ability to be translated into other languages easily. For instance, if you code a “Save” button like the one below, it wouldn’t support i11n.
Instead, follow the code shown below to ensure it is easily translatable.
Make sure you follow the official WordPress Internationalization documentation to ensure you are doing i11n in the best way possible.
Prefix functions & add namespace to Class
When developing a plugin for the first time, there is a good chance you may write a function like this:
Although it might work when creating the plugin on a local environment, there is a high chance of naming collision with other plugins. That is because there might be other plugins in the WordPress library with the same function name, resulting in a fatal PHP error.
To solve this issue, it would be best if you prefixed your functions. For instance, rather than writing get_data(), change the function name to your_prefix_get_data().
Write the directory name of your plugin or text domain in place of your_prefix. For example, we’ll be using hello_world_get_data().
Moreover, to ensure there are no other existing functions with the same name, check with this kind of code:
It will help you prevent naming collisions and make your function overwritable through Theme or Child Theme.
Following these tips will help you develop the best plugin and optimize your website in the best way possible.

Frequently Asked Questions
You can find thousands of text and video tutorials along with full-version courses online. But it would best first to acquaint yourself with the official WordPress documentation, including
- 1. Official Plugin Development Handbook
- 2. Plugin Development Resources
- 3. WordPress Coding Standards
These documentations will help you develop your own plugin according to WordPress standards with ease.
Arguably, the most significant advantage of using WordPress plugins is that they can help enhance the functionality and features of your website. With plugins, you can effectively customize your website without changing the core structure of WordPress.
Thousands of free and premium plugins are already available in the WordPress plugin library. Check these plugins to see if there are any that might fulfill your requirements. If so, you can use an already existing one. If not, you can develop your plugin following the steps shown above.
Every WordPress plugin you download, install, or create will be stored in the directory /wp-content/plugins/.
To develop a new plugin, you must understand the core tech and languages that power WordPress: JavaScript and HTML/CSS for front-end development and SQL and PHP for back-end development.
If your plugin is according to the requirements and guidelines for plugins, you can follow these simple steps and publish it on the WordPress plugin directory.
The quickest way to uninstall a plugin permanently is to deactivate it and remove its plugin directory. Moreover, you can check out the uninstall hook to automate the uninstallation process.
If you are new to the WordPress plugin development space or don’t have the adequate skills or experience to proceed, start with a small-scope plugin. But if you are not just doing it for the sake of trying and want to actually use a complex plugin for your website, get in touch with skilled and experienced developers from WPPlugin Experts.


