
How to Use AJAX in WordPress with PHP and JavaScript
Ever wondered how WordPress sites load more content without refreshing the page? That’s the magic of AJAX. It helps create...

Table of Contents
If your WordPress site starts crashing while uploading files, running scripts, or activating plugins, there is a chance that your PHP memory limit is not sufficient. This common issue can break features, slow things down, or trigger the dreaded “Allowed memory size exhausted” error.
Thankfully, increasing the memory limit in WordPress is easier than it sounds. From simple config edits to server-side changes, you’ve got multiple options—no need to panic or rely on guesswork.
Whether you’re handling it yourself or working with a WordPress development agency, knowing how memory allocation works is the first step. Let’s start by understanding what the WordPress memory limit is and why it matters.
Every time WordPress loads a page, runs a plugin, or processes a task, it uses PHP (the scripting language it’s built on). Like any application, PHP needs memory to function.
The PHP memory limit defines how much memory a single PHP script is allowed to use on your server. If WordPress needs more than what’s available, it crashes or throws errors. This limit is set in your hosting environment, but WordPress also sets its own limits through two key constants:
This constant defines the maximum memory WordPress can use for frontend/public-facing pages.
Example:
define('WP_MEMORY_LIMIT', '128M');
This would allow WordPress to use up to 128MB of memory for regular user-facing operations.
This one controls the memory limit for admin-side tasks – like editing large posts, importing data, running backups, or working inside a page builder.
Example:
define('WP_MAX_MEMORY_LIMIT', '256M');
With this, backend processes can use up to 256MB, even if the frontend limit is lower.
Tip: Many users set only WP_MEMORY_LIMIT and still experience issues in the admin area. It’s a good practice to define both constants to ensure consistency across your site.
Getting familiar with these limits is the first step to resolving memory-related issues. Next, we’ll explore how to check your current limit and walk through the safest ways to increase it.
Before you increase the memory limit, it’s important to know what you’re currently working with. WordPress and your server offer a few simple ways to check the existing memory allocation. Here are some reliable methods suited for both beginners and advanced users.
WordPress has a built-in tool that shows useful server information:
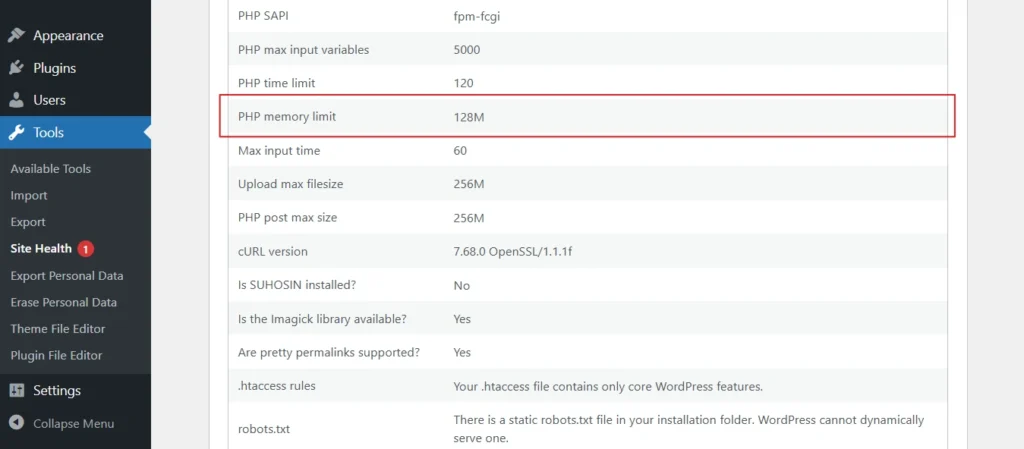
This is the easiest and safest method, requiring no code or plugins.
Create a new PHP file in your root directory (where wp-config.php is), and name it something like phpinfo.php.
Code:
<?php phpinfo(); ?>
Upload it via FTP or File Manager and open it in your browser:
Example: https://yoursite.com/phpinfo.php
Look for the line:
memory_limit => 128M => 128M
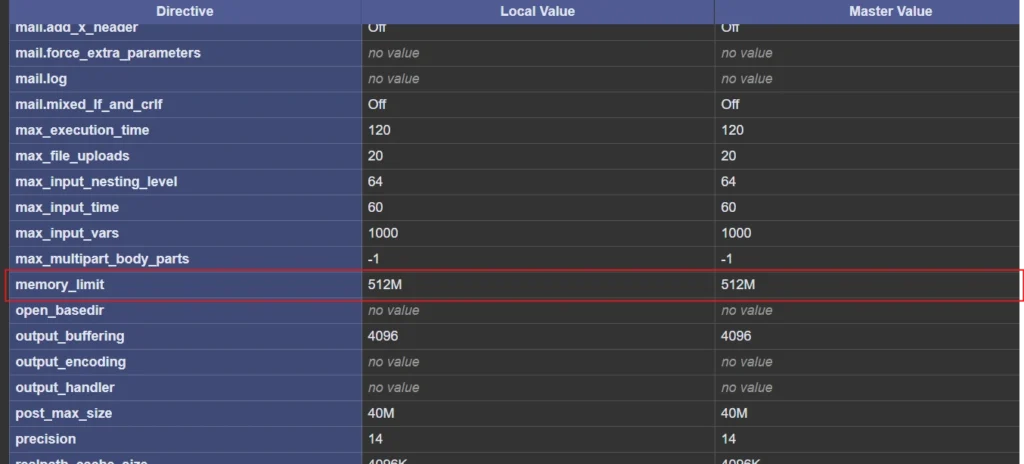
The value shown is your current memory limit. Don’t forget to delete this file afterward for security reasons.
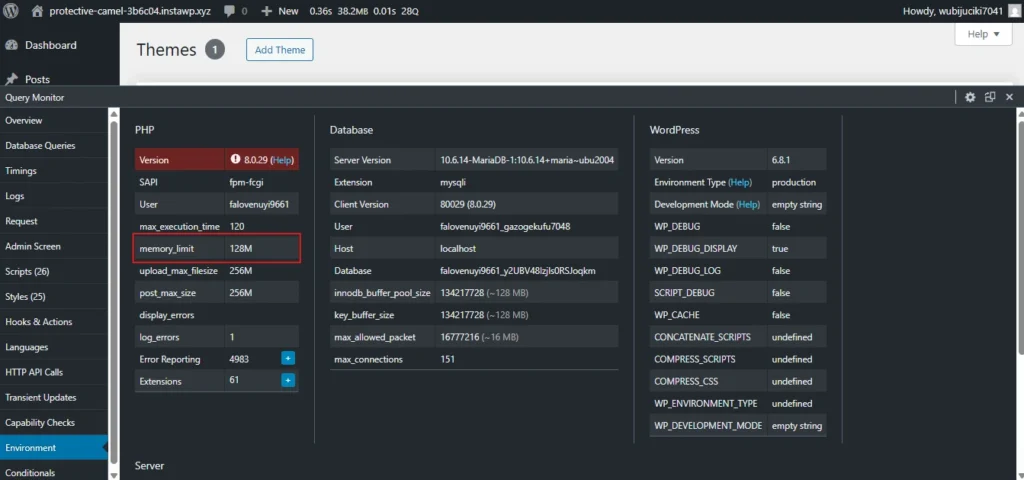
Install a plugin like Query Monitor or WP-ServerInfo to quickly view PHP memory and other server settings within the WordPress dashboard. Here’s a quick look from “Query Monitor – The developer tools panel for WordPress”.
Here’s a quick look from “WP-ServerInfo”.
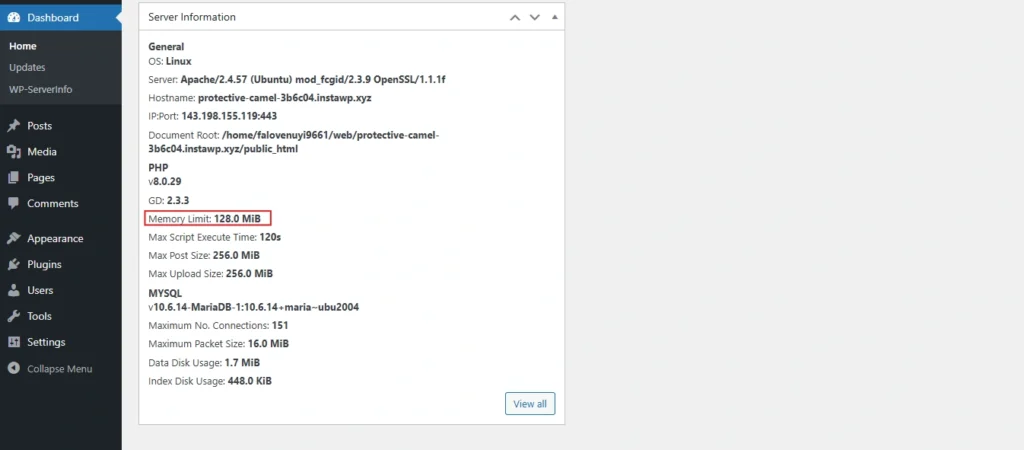
This is great for users who prefer not to access server files directly.
If you have SSH access, run this command to check memory directly from the server:
php -i | grep memory
It will return something like:
memory_limit => 128M => 128M
It’s perfect for developers working on VPS or dedicated servers. Each method offers a different level of insight, depending on your setup. Once you know your current memory limit, you’re ready to move on to increasing it–safely and effectively.
Once you’ve confirmed your current PHP memory limit, it’s time to increase it, especially if you’re running into performance issues, plugin errors, or white screens. Below are five tried-and-tested methods, each tailored to different types of hosting setups. Choose the one that fits your environment and comfort level.
Note: Not all hosts allow all methods. If one doesn’t work, try another or contact your hosting support.
This method is safe and works on most installations where you have file access.
Steps:
define('WP_MEMORY_LIMIT', '256M');
define('WP_MAX_MEMORY_LIMIT', '256M');
This increases the memory for both frontend and backend processes.
If you manage your own server or have access to PHP configuration:
Steps:
memory_limit = 256M
This globally sets PHP memory limits. It may not work on shared hosting unless explicitly allowed.
If your site runs on Apache (most shared hosting does), you can increase memory via .htaccess.
Steps:
php_value memory_limit 256M
Warning: This might trigger a 500 Internal Server Error if your server doesn’t allow PHP settings in .htaccess.
If your host offers a control panel, you can often change PHP settings there:
In cPanel:
This is the easiest way for shared hosting users if file edits aren’t allowed.
If you’re using PHP-FPM (common in modern shared hosting), .htaccess or php.ini changes might not apply. In that case, use a .user.ini file.
Steps:
memory_limit = 256M
The changes may take a few minutes to apply. These methods cover nearly every hosting setup, from shared hosting to advanced VPS environments. Test your site after making changes, and verify the new limit using the methods we covered earlier. If one approach doesn’t work, don’t worry–try the next one on the list.
Most tutorials stop at showing you how to increase the memory limit, but there are a few deeper considerations that can really help optimize your WordPress setup. These tips address what’s often overlooked but make a real difference–especially for developers, site managers, or anyone running resource-heavy websites.
Boosting the memory limit in WordPress only tells PHP it’s allowed to use more memory. It doesn’t magically increase the actual available memory on your server.
Example:
If your server only has 512MB of total memory and you allow WordPress to use 512M, other processes (like MySQL or Nginx) might get starved and crash.
Insight: Always balance the memory limit with your actual server specs. On shared hosting, 128M–256M is safe. On a VPS, you can afford more–but monitor resource usage.
WordPress memory limits can vary depending on the environment:
Set limits at both the WordPress level (wp-config.php) and PHP level (php.ini or .user.ini) for full coverage.
If you’re developing or debugging, use the memory_get_usage() and memory_get_peak_usage() functions to see how much memory is being consumed.
Example:
echo 'Memory used: ' . round(memory_get_usage() / 1048576, 2) . ' MB';
echo 'Peak memory: ' . round(memory_get_peak_usage() / 1048576, 2) . ' MB';
This helps you identify plugins or functions that consume too much memory, especially on complex or bloated sites.
Even if you raise the memory limit, fatal errors like out-of-memory exceptions may still occur if a process tries to exceed it in one go–especially during:
Break large tasks into smaller chunks or use tools with memory-efficient design (like WP All Import with chunked imports).
Knowing about the best practices will help you adopt a smarter approach for WordPress memory management. Setting up the memory limit will you avoid crashes along with speeding up the WordPress dashboard.
For most WordPress sites, 128MB of memory is enough. But if you’re running heavy themes, large plugins, or WooCommerce, aim for 256MB or more to avoid memory-related issues and improve performance.
You can check your WordPress memory limit by using:
– Site Health Tool (under Tools > Site Health > Info tab)
– A phpinfo.php file uploaded to your server
– Memory display plugins like WP Server Info
– Or CLI: wp –info via WP-CLI
WordPress itself doesn’t have a storage limit, but your web hosting plan does. Storage depends on your hosting provider—shared hosting may offer 1–10GB, while managed or VPS hosting gives more flexibility.
There’s no strict limit for memory size from WordPress, but 512MB is generally the upper recommended threshold. The actual max depends on your server config and PHP settings (like memory_limit in php.ini).
It’s an error that means WordPress used all the allocated PHP memory and couldn’t complete the process. To fix it, you need to increase the memory limit in wp-config.php or through server settings.
Running into memory limit issues is frustrating, but the fix is usually straightforward. Whether it’s tweaking your wp-config.php, editing server files, or using hosting tools, there’s always a method that fits your setup.
Understanding how memory allocation works can help prevent crashes, improve performance, and ensure your site scales smoothly as it grows. It’s one of those behind-the-scenes fixes that make a big difference.
If you’re looking for a stable, high-performance WordPress setup, our WordPress experts can help. Contact us today, and let’s optimize your site together.
Ever wondered how WordPress sites load more content without refreshing the page? That’s the magic of AJAX. It helps create...

Your WordPress site might be pushing visitors away without you even realizing it. That harmless “Not Secure” warning in the...

Here’s a scenario for you. You open your website and see a blank white screen with the message “There has...